.

Showing posts with label Blogger Tricks. Show all posts

Ultimate Keyword Research Guide For Bloggers


√

What are keywords?

If you are a regular blogger then you might be knowing what I am talking to but if you are a newbie then this word keyword may be a little new for you.Keywords are the words which are used by people while searching on Google, Bing ,Yahoo and other search engines.Keywords play a major role in on page optimization.


Importance of Keywords in Search Engine Ranking:

After Google Panda and Penguin Updates it is said that keyword stuffing and seo is dead but believe me its not. Still Keywords have a great impact in search results.Search Engines especially Google look for the searches which matches the exact keywords searched by Google  However page rank and many other factors has a great impact on search engine ranking(SEO).


Tools to get started with Keywords Research:

The best tool to get started with Keywords Research is Google Adwords Keywords Tool.There are many other advanced paid tools as well but this one is free which is provided by mighty Google  I personally use this tool to do keyword research.This tool shows the number of monthly searches globally and locally for a particular keyword.So, with that information you can come to an estimation on how much traffic you can bring to your website/blog from search engines.

How to get started with Keywords Research?


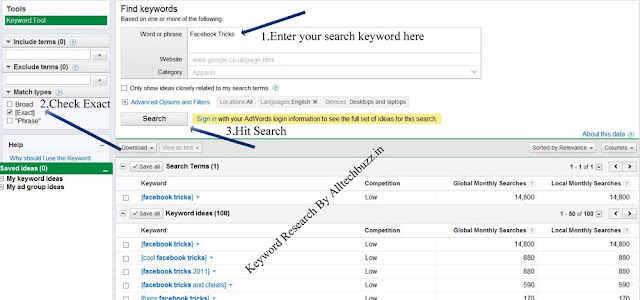
  • To get started with Keyword research go to Google Adwords Keywords Tool.
  • Enter the keyword for which you want to look the monthly search count.
For example I will check the number of searches for "Facebook Tricks" keyword.

Enter the keyword and hit search.As soon as you hit search you will be displayed the list of all similar keywords and their global and local monthly searches.But the search which you get is the broad search which also include other keywords like "Tricks Facebook","Facebook Trick",Tricks of Facebook 2012" etc etc.Many bloggers think that this is the exact traffic for those keywords but its not ,you have to un check the Broad search and check Exact. That will give you the exact number of searches for that particular keyword.
Ultimate Keyword Research Guide For Bloggers

You can also check the number of searches in a particular country and in particular language.

Now which Keyword To Choose?

It is advised to choose keywords with low competition.After you get results of keywords and their monthly searches just go to Google and check the results of keywords in Google search results.
If you find many top blogs/websites with those exact keywords are ranking high in Google then it is recommended to stay away from those keywords if your blog is new or if you don't have much traffic from Google.

Where to use Keywords?


Use Keywords in Post Title:

The title of the post decides how much traffic you are going to get.Include most of the keywords in your title instead of conjunctions and prepositions.Don't use same keywords repeatedly in title.Such cases will be penalized by Google and your blog will be effected very badly.

Use Keywords in the Post:

You have to use as many keywords as you can in the body of the post.Though keywords in title plays the major role ,content also has its own importance.In the body of the post use those keywords which you didn't use in your post title but which are similar to that keywords.Keep the keywords density less than 4%. Up to 4% keyword density would work fine but if you use more than that then it may lead to penalty.To avoid penalty by Google Penguin and Panda Updates write posts with more than 700-1000 words.

Use Keywords in Custom URL structure:

Avoid using prepositions and conjunctions in URL of the post.Use only keywords in the custom URL structure for your post.

Use keywords in Search Description:

Search description is the description shown in Google next to the the title.Use few keywords which you used in the post title for better ranking.

Use Keywords in H2,H3,H4 etc Tags:

Use proper keywords in heading tags in your post. Don't use too many but use reasonably.

Conclusion:

Though keywords play a major role in search engine ranking, do not over optimize your posts with keywords.Keywords should come naturally.To avoid getting penalized by Google write lengthy posts with good number of keywords.Always maintain quality in your posts.


How To Create Popular Post With Carousel Slider


√
In this Tutorial i will show, how to create Popular Posts with carousel slider. The reason for this, I have received some comments asking about how to create popular posts. My last tutorial was about how to show blogger (Popular Posts ) widget only in homepage.  I also posted other tutorial about How to create Multi Column Footer Widget and How to add a Drop Down Menu to blogger. Again this is not easy to do for new comers but is still easy for old ones who have good knowledge of these codes. But still beginners can do by following the steps given. However you can also read some other related articles/posts and i highly recommend this for beginners. So read older post. You can read older post by scrolling down to Related Posts or go back manually. Related posts will helps you to make your blog different from others.

Some Features of Popular Post for blogger are :

  • SEO friendly (not javascript)
  • Dynamic result based on real statistic
  • Easy to custumized
Because of these features listed above, I post this tutorial and make this widget to show popular post with Carousel slider and it can show image and snipped horizontally like this:


Finally, Lets start our work and perform some easy steps:

1: Go To Blogger > Design > Page Elements
2: Click “Add Gadget” and Choose “Popular Posts”(If you already have this gadget then skip this step)


If you have Popular Post Gadget then :
3: Click on "Add a Gadget" again and Select a HTML/JavaScript Widget just under the header and paste the following code inside it,


<style>

#slider ol,#slider ul,#slider li
{
margin: 0;
padding: 0;
border: 0;
outline: 0;
font-size: 100%;
}

.popular-posts img {
margin: 0 !important;
padding:0 !important;
width:150px;
height:120px;
}

ol, ul {
list-style: none;
}

.wrapper {
width: 720px;
margin: 0 auto;
position:relative;
}

.clear {
clear: both;
}

.display-none {
display:none;
}

#slider {
position: relative;
top: -2px;
z-index: 1;
}

#slider .prev {
position: absolute;
width: 21px;
height: 21px;
display: block;
background: url(http://i575.photobucket.com/albums/ss197/akhmadaminullah/arleft.png) no-repeat center center;
top: 150px;
left: -51px;
}

#slider .next {
position: absolute;
width: 21px;
height: 21px;
display: block;
background: url(http://i575.photobucket.com/albums/ss197/akhmadaminullah/arright.png) no-repeat center center;
top: 150px;
right: -51px;
}

#slider #slider-wrapper {
width: 720px;
height: 300px;
padding-top: 40px;
overflow: hidden;
z-index: 999;
position: relative;
}

#slider #slider-inner {
width:9780px;
height:300px;
position:absolute;
}

#slider .article {
width: 150px;
height: 300px;
float: left;
margin-right: 30px;
}

#slider .article img {
margin-bottom: 25px;
box-shadow: 1px 1px 1px rgba(0, 0, 0, .15);
-moz-box-shadow: 1px 1px 1px rgba(0, 0, 0, .15);
-webkit-box-shadow: 1px 1px 1px rgba(0, 0, 0, .15);
}

#slider .article h2 {
margin-bottom: 15px;
line-height: 18px;
}

#slider .article h2 a {
font-size: 18px;
color: #404040;
font-weight: bold;
text-shadow: 0 1px 0 #fff;
line-height: 23px;
}

#slider .article .meta-comments a {
font-size: 10px;
font-weight: bold;
text-transform: uppercase;
text-shadow: 0 1px 0 #fff;
}

#slider .article .item-snippet {
margin-left: 15px;
}

#slider .widget-item-control { display: none}

</style>
<script type="text/javascript" src="http://ajax.googleapis.com/ajax/libs/jquery/1.6.1/jquery.min.js"></script>
<script type="text/javascript" src="http://accordion-for-blogger.googlecode.com/svn/trunk/gridslidepopularpost.js"></script>

4: Save it and You are done.


How To Show Blogger Widget Only In Homepage


√
In this Tutorial i will show you, how to show blogger (Popular Posts ) widget only in homepage. The reason for this is that, I have received many comments asking about how to show popular posts only in homepage. I also posted other tutorial about How to create Multi Column Footer Widget and How to add a Drop Down Menu to blogger. This is actually not easy to do for new comers but is still easy for old ones. Not only this you can also read other related articles/posts. Make your blog pretty simple and different from others so lets start our work and perform some easy steps:

1: Go To Blogger > Template > Edit HTML


2: Find (Ctrl+F) this code given below:


<b:section class='tabs' id='crosscol' maxwidgets='1' showaddelement='yes'><b:widget id='PopularPosts1' locked='false' title='Popular Posts' type='PopularPosts'/></b:section>

3: Replace with this:

<b:if cond='data:blog.url == data:blog.homepageUrl'><b:section class='tabs' id='crosscol' maxwidgets='1' showaddelement='yes'><b:widget id='PopularPosts1' locked='false' title='Popular Posts' type='PopularPosts'/></b:section></b:if>

4: Now click on save template. You're done!


10 Tips On How To Increase Alexa Rank Of Your Blog


√
After Google Page Rank the number which is given high importance by webmasters is Alexa Rank.Believe me many of them judge your blog/website by just seeing your Alexa Rank.Even advertisers check your Alexa Rank to advertise on your blog

increase Alexa Rank


Well honestly speaking Alexa rank is just rubbish and has nothing to do with your blog traffic.So what is this Alexa Ranking and how to get better Alexa Ranking read on.......


What is Alexa Rank?


Alexa.com defines themself as a "web information company".They rank every website and blog  based on their traffic and some other factors.This Alexa Rank gets updated daily.Lesser the number better.

How Alexa Rank is measured?


You might freak out after reading "How Alexa Ranking is measured?"
Alexa.com is measuring your website’s traffic is one of the most unfair surveys around. Why?
They only record those hits which passes through their systems.That means your visitors either have to Install Alexa Toolbar on their browser or you should put an Alexa widget/plugin installed on your blog.
That means the blogs under the niche Blogging,Technology will have a better Alexa Rank compared with the blogs which are not related to Tech Stuff.

10 Tips to Increase Alexa Ranking:

1.Install Alexa Tool Bar:


Install Alexa Toolbar on your browser and also ask your friends, visitors to install toolbar on their browser.

2.Claim your site:


To gain full control over your site.Claim your site on Alexa.com.This will help others to know who owns the site and helps you in ranking better on Alexa.

3.Put Alexa Widget on your blog:


As I already said Alexa counts only those hits which comes under their system.So put an Alexa widget on your blog.

4.Get Traffic From Bloggers and Techy guys:


This is the most important factor that effects your Alexa Rank.If you get more visitors who are bloggers and techy guys then your alexa rank will increase fast because all the Bloggers and Techy people will be installing alexa widget on their browsers.

-----> Also Read: How To Increase Blog Traffic.

5.Write a review about Alexa on your blog:


Write a review about Alexa Ranking and link back to Alexa.com.

6.Ask your visitors to review your blog on Alexa:


Review your blog on Alexa.com and ask your visitors to review your blog.
Write a Review of our Blog on Alexa.

7.Commenting and Backlinking:


Comment on other blogs which are under the niche Blogging and Technology with good traffic and link back to your blog.In this way build more links from blogs with good traffic because backlinks are crucial as you might have noticed that alexa even calculates the number of backlinks you have.

8.Update your blog regularly:


It is strongly recommended to write frequently to increase your alexa rank or else your alexa rank will go down and it becomes hard to bring back your alexa again.

9.Write quality posts:


As I always say quality matters.If you write quality posts then others will automatically link back to you and thereby increasing backlinks and traffic as well which increases your alexa rank.


10.Share your posts on Social Networking sites:


Share your posts on social networks like Facebook,Stumble upon and Digg.These sites not only brings massive traffic but also helps in increasing your Alexa Rank.


Jquery Slideshow For Blogger


√
Image slideshow Widget for Blogger blog. This widget is different from its previous versions with regard to speed, load time, navigation and control options. This widget is an extracted code from a WordPress template. The slider is coded such that it will appear on your homepage.


Now follow these steps:
    1. Go To Blogger > Design > Edit HTML
    2. Backup your template >Important<
    3. Search for </head>
    4. Just above it paste the jQuery code in this page -> Slider jQuery Code
    5. Then search for ]]></b:skin>
    6. Just above it paste the CSS code below,

    /*-------------------- jQuery Image Slider -------------*/
    .featuredposts{border:1px solid #E9E7DE;width:608px;background:#FFF;margin:0 0 10px 0;height:400px;overflow:hidden;}
    .fp-slides{}
    .fp-post{padding:13px;}
    .fp-thumbnail{border:3px solid #dddddd; width:580px;height:266px;margin-bottom:10px;overflow:hidden;}
    .fp-thumbnail:hover{border:3px solid #CAC9C9;width:580px;height:266px;margin-bottom:10px;overflow:hidden;}
    .fp-title{color:#787878;font:bold 14px  Arial, Helvetica, Sans-serif;padding:0 0 4px 0;margin:0; text-transform:uppercase;}
    .fp-title a{color:#000;text-decoration:none;}
    .fp-title a:hover{color:#0080fF;text-decoration:none;}
    .fp-label{color:#504D4D;margin:15px 15px 0 15px;padding:0;text-transform:uppercase;font:bold 16px/16px Arial,Helvetica,Sans-serif;}
    .fp-post p{color:#504D4D;padding:0;margin:0;font:10px Arial,Helvetica,Sans-serif;height:32px;overflow:hidden;}
    .fp-more,.fp-more:hover{color:#F77C04;font-weight:bold;}
    .fp-nav{width:590px;padding:0px 10px;height:14px;}
    .fp-pager a{background-image:url();cursor:pointer;margin:3px 6px 0 0;padding:0;height:10px;width:10px;display:block;float:left;overflow:hidden;text-indent:-999px;background-position:0 0;}
    .fp-pager a:hover,.fp-pager a.activeSlide{text-decoration:none;background-position:0 -110px;}
    .fp-prev{float:right;margin-right:4px;width:15px;height:17px;opacity:0.7;background:url(https://blogger.googleusercontent.com/img/b/R29vZ2xl/AVvXsEjX1lbDtBcba4pHCGO2fWxHt2scepFNSoP-vt1eL9iylrB9_dfx8BK6V5zxZS5N9FZh3DBipJK-bjTAIER46arSPVEFIieD1wQDK0yxRdsO1MAgj_PxM-1J81zbsTpfmB62V8lAQWpCPe0/s1600/featured-prev.png) top left no-repeat;}
    .fp-prev:hover{opacity:1;}
    .fp-prev:active{opacity:0.7;}
    .fp-next{float:right;width:15px;height:17px;margin-left:4px;opacity:0.7;background:url(https://blogger.googleusercontent.com/img/b/R29vZ2xl/AVvXsEgU-C_F_v2pijGbKkNbN1terD4YYtfJZqH3v7anN8chOMmuVb-wsfYC0X_7A0SzQcpaa1uE0ZYF6FU4X5nlDYu1ECVImWiq_YW-bRWVQfijy40Bc2pRTzmFg_cllyt0OboDGg3FA8C6N60/s1600/featured-next.png;) top left no-repeat}
    .fp-next:hover{opacity:1;}
    .fp-next:active{opacity:0.7;}

              7.   Now Search for this, 
    <div id='main-wrapper'>
    Hint: This code is located near <div id='content-wrapper'>
    PS: In this part most of you will face problems as the coding for each template differ. If you could not find this code then do not panic and simply post your Blog URL in the comment box.
       8.   and just below it add the HTML code below,
    <b:if cond='data:blog.pageType != &quot;static_page&quot;'>
    <b:if cond='data:blog.pageType != &quot;item&quot;'>

    <div class='featuredposts clearfix'>
    <div class='fp-slides'>
    <div class='fp-post'>
    <div class='fp-thumbnail'><a href='ADD POST URL-1 HERE'><img src='ADD IMAGE-1 LINK HERE'/></a></div><h3 class='fp-title'><a href='ADD POST URL-1 HERE'>WRITE POST TITLE HERE...</a></h3> <p>WRITE POST DESCRIPTION HERE... </p>
    </div>
    <div class='fp-post'>
    <div class='fp-thumbnail'><a href='ADD POST URL-2 HERE'><img src='ADD IMAGE-2 LINK HERE'/></a></div>
    <h3 class='fp-title'><a href='ADD POST URL-2 HERE'>WRITE POST TITLE HERE...</a></h3> <p> WRITE POST DESCRIPTION HERE... </p>
    </div>
    <div class='fp-post'>
    <div class='fp-thumbnail'><a href='ADD POST URL-3 HERE'><img src='ADD IMAGE-3 LINK HERE'/></a></div>
    <h3 class='fp-title'><a href='ADD POST URL-3 HERE'>WRITE POST TITLE HERE...</a></h3> <p> WRITE POST DESCRIPTION HERE... </p>
    </div>
    <div class='fp-post'>
    <div class='fp-thumbnail'><a href='ADD POST URL-4 HERE'><img src='ADD IMAGE-4 LINK HERE'/></a></div>
    <h3 class='fp-title'><a href='ADD POST URL-4 HERE'>WRITE POST TITLE HERE...</a></h3> <p> WRITE POST DESCRIPTION HERE... </p>
    </div>
    <div class='fp-post'>
    <div class='fp-thumbnail'><a href='ADD POST URL-5 HERE'><img src='ADD IMAGE-5 LINK HERE'/></a></div>
    <h3 class='fp-title'><a href='ADD POST URL-5 HERE'>WRITE POST TITLE HERE...</a></h3> <p> WRITE POST DESCRIPTION HERE... </p>
    </div>
    </div>     
    <div class='fp-nav clearfix'>
    <span class='fp-pager'/>          
    <a class='fp-next' href='#fp-next'/>
    <a class='fp-prev' href='#fp-prev'/>
    </div>
        
    </div>

    </b:if></b:if>
    Make these changes:

    • Replace ADD POST URL-1, 2, 3, 4, 5 HERE with the URL of your post pages one by one. These URLs will be added twice for each slide. Once for the image and second time for the Post title.
    • Replace ADD IMAGE-5 LINK HERE with the Image link of the Featured post. By default all images have width:580px; height:266px; You can edit the image size by editing the width and height in the CSS code shared in step#6. Make sure all your images must have same size
    • Replace WRITE POST TITLE HERE... with the title of your Post Page
    • Replace WRITE POST DESCRIPTION HERE with the Post Page description. You can write the first few lines of your post here and the readers can read the full post by clicking the title.
    • To Change the Overall size of the slider container then edit in step#6 the following two codes -> width:608px and height:400px
       9.   Save your template and you are done! Visit your blog.


    Vertical Floating Social Sharing Bar Widget


    √

    You have seen that the trend of floating sharing count buttons on popular blogs websites. As you know the traditional icons are now replaced with auto counter buttons that are updated in seconds. I created totaly different version of this bar, applying both jQuery effects and CSS 3 styles. But this widget is so many times different because it contains custom facebook, google+, twitter, pinterest and an Email button.  Vertical floating social sharing bar is one of the best blogger new widgets, because you can notice the increasing trend of social sharing widgets.This version is the upgraded version than previous versions.So in this widget you will get facebook like button,twitter tweet button, pinterest pin it button, google +1 button, addthis sharing button and print button. The installation of this widget is simple so that you can easily implement it into your blog. 


    The steps are extremely easy to apply to your blog/blogger. All you need is to copy and paste the codes. Follow these friendly steps:


    1. First Go to Blogger Dashboard > Template
    2. Download a copy of your template
    3. Click Edit HTML
    4. Hit Proceed button
    5. Check Expand Widget Templates checkbox
    6. Find for below code in your template,


    <b:includable id='post' var='post'>
    7. Just below it paste the following code:

    <b:if cond='data:blog.pageType == &quot;item&quot;'> 
    <b:if cond='data:blog.pageType != &quot;static_page&quot;'> 
    <style> 
    .mbt_social_floating{ 
        position:fixed; bottom:10%; margin-left:-60px; float:left;     width:60px; 
        background-color:#f7f7f7;     padding: 5px 0 0px 0px; 
         border-top:1px solid #ddd; 
    border-left:1px solid #ddd; 
    border-bottom:1px solid #ddd; 
    z-index:9999px !important; 
    border-radius:5px;-moz-border-radius:5px;-webkit-border-radius:5px; 
    } 
    .mbt_social_floating .mbt_side_social_button{ 
        margin-bottom:5px; 
        float:none; 
        height:auto; 
        width:60px; 
    } 
    .mbt_social_floating .st_twitter_vcount, .mbt_social_floating.st_plusone_vcount, .st_email{ 
        margin-left:5px; 
    } 
    .mbt_social_floating .st_fblike_vcount{ 
        margin-left:5px; 
    } 
    .mbt_social_floating .stButton_gradient{ 
        background:none !important; 
        height:21px !important; 
        padding-left:0 !important; 
    } 
    .mbt_social_floating .chicklets, .mbt_social_floating .stMainServices { 
        background:url(&#39;https://blogger.googleusercontent.com/img/b/R29vZ2xl/AVvXsEjazpIwYDX-I3UNF6uRLamFeHXjikrQX16GGX7wysdBb34HusOqhJbOglHNSuUYRNcjg5wyv-32sulK_mXIIfE8bGkxImatDT9dXjiRtC79G3F67cq8Ylc1P5Jv7sCJdkhsBtYdpszPc7yL/s400/gc_social_sprite.gif&#39;) no-repeat !important; 
        height:19px !important; 
        width:45px !important; 
        padding:0 !important; 
    } 
    .st_email .chicklets{ 
        background-position:0 -77px !important; 
        background-image:url(&#39;https://blogger.googleusercontent.com/img/b/R29vZ2xl/AVvXsEjazpIwYDX-I3UNF6uRLamFeHXjikrQX16GGX7wysdBb34HusOqhJbOglHNSuUYRNcjg5wyv-32sulK_mXIIfE8bGkxImatDT9dXjiRtC79G3F67cq8Ylc1P5Jv7sCJdkhsBtYdpszPc7yL/s400/gc_social_sprite.gif&#39;) !important; 
    } 
    .mbt_social_floating .st_twitter_vcount .st-twitter-counter{ 
        background-position:0 -58px !important; 
    } 
    .mbt_social_floating  .stButton_gradient{ 
        border:none !important; 
    } 
    .mbt_social_floating .stBubble_count{ 
        width:44px !important; 
        font-size: 15px !important; 
        font-weight: normal !important; 
        padding-top:7px !important; 
        height:23px !important; 
        background:none !important; 
    } 
    .mbt_social_floating .st_twitter_vcount .stBubble_count{ 
        color:#00a6df; 
        background-color:#f8fbfc !important; 
    } 

    .st_fblike_vcount{ 
        margin-bottom: 0px; 
        display: block; 
    } 
    .st_twitter_vcount{ 
        margin-bottom: 3px; 
        display: block; 
    } 

    .st_email{ 
        margin-bottom: 5px; margin-top: 3px; 
        display: block; 
    } 
    .mbt_social_floating .stBubble{ 
        background-position: 21px 31px !important; 
        height:35px !important; 
    }.mbt_social_floating .st_pinterest_vcount{
        margin-left:5px;
    }
    .mbt_social_floating .st_pinterest_vcount .st-pinterest-counter{
        background-position:0 -19px !important;
    }
    .mbt_social_floating .st_pinterest_vcount .stBubble_count{
        color:#FF0505;
        background-color:#fbf8f8 !important; 
    }

    .mbt_social_floating .st_pinterest_vcount .stBubble{
        background-image:url('https://blogger.googleusercontent.com/img/b/R29vZ2xl/AVvXsEjVAQmNm_G8_ZCfMAGeH_6xsNb2aYc4aMKZB5Fo2077pB52J1OvK2A2kuFNYznKJWyYC__fPslvoOmB7UW9FMe9mUlPfV6B9UgEIO0QwiQ5M_yHiE0cX_c3cetMfgiCsgKDQrCnagm1JT6R/s400/bubble_arrow_pinterest.png') !important;
    }


    .st_pinterest_vcount{
        margin-bottom: 0px;
        display: block;
    }

    </style> 

    <div class='mbt_social_floating'> 
        <script type='text/javascript'>var switchTo5x=true;</script> 
        <script src='http://w.sharethis.com/button/buttons.js' type='text/javascript'/> 
        <script type='text/javascript'>stLight.options({onhover:false});</script> 
        <span class='st_fblike_vcount' displaytext=''/> 
        <span class='st_twitter_vcount' displaytext='' st_via='crackmodo'/> 
    <span class='st_pinterest_vcount' displaytext=''/>
    <div style='margin:0px 0 0 5px;'> 
        <span class='st_plusone_vcount' displaytext=''/> 
    </div> 
        
    <div class='addthis_toolbox addthis_default_style ' style='margin:5px 0px 5px 8px;'> 
    <a class='addthis_counter'/> 
    </div> 
    <script src='http://s7.addthis.com/js/250/addthis_widget.js' type='text/javascript'/> 
    <script type='text/javascript'> 
    var addthis_config = { 
         ui_cobrand: &quot;MY BLOGGER TRICKS&quot;, 
    ui_header_color: &quot;#ffffff&quot;, 
         ui_header_background: &quot;#0080FF&quot; 
    } 
    </script> 
    <span class='st_email' displaytext=''/> 
    <p style=' line-height:0px; font-size:10px; font-weight:bold; text-align:center;'><a href='http://crackmodo.blogspot.com/2013/01/vertical-social-widget.html' style='color:#CAC8C8;'>Widgets</a></p> 
    </div> 
    </b:if></b:if>


    8. Now replace CrackModo with your twitter username.

    Now save the template and you are done.

    15 Fresh Resources For Developers And Designers


    √
    You will find many resources for designers and developers and of course you wouldn’t always know which one is the best to put to use. That’s where we come in. We have compiled this particular list of 15 fresh resources for developers and designers in order to help you out. These resources have been compiled after scouring the internet for you and these are the best of the best. We will keep updating you regarding more resources as we find them. We hope this list proves helpful and you enjoy the read. Your feedback is always welcome.

    Also Read : 30 Fresh Useful Resources for Developers and Designers

    COLOR SCHEMES


    If you guys are programmers are using either Sublime Text 2 or Textmate for editing code then you might want to consider this particular tool called color schemes. This package is created by Dayle Rees and I am sure looking at the picture gives you the picture of what this package does. You have around 30 different color schemes that you can use to your liking. It does make things easier.


    This particular tool is a jQuery plugin and it helps you to add accented characters very easily. You might already be familiar with the concept of long press if you use android devices because they use that function in for almost every command. If you hold down the ‘a’ or ‘e’ key, additional characters popup (as can also be seen in the picture). This can help you save a lot of time and it also makes it easier for you to find ‘special’ characters.

    LAYOUT ICONS


    There are many different websites that offer you different sets of icons that might include social media icons or even general user-interface icons but this is a little different. This package is created by Ales Nesetril and these icons represent the layout of the web. I am pretty sure you guys can make sense of that just by looking at the icons. These icons are bound to come in handy if you are building a content management system.


    We are pretty sure that you are aware of the new features of CSS3 and their application in web animation. Adobe edge was recently introduced and with it comes Adobe Edge Animate. The software is essentially similar to Adobe Flash although the only difference is that it creates animations for the web and you know exactly how easy Adobe makes things so you can pretty much say that web animation just got easier. It is still free so you might want to get your hands on it  soon.


    Have you ever visited the website called Reddit? If so then it’s all good but if you have not then you might want to visit and see if it appeals to you or not? Well, if it does than the good news is that you can build a similar website using telescope. This real-time social news framework is built upon Meteor which is equipped with many different features including but not limited to real-time updating, invite-only access, notification and e-mail authentication.


    Just reading the name we are pretty sure you guess as to what the functionality might be, not to mention looking at the picture. It is for designers to draw their ideas as soon as it hits their heads. There are a few typography elements you can use and general shape to give your idea an outline. You can create several documents and thereby adjust their width and height etc.


    We are certain that you understand exactly how important and used scalable vector graphics are when it comes to websites for which purpose there are many different editors available for you to edit your scalable vector graphics. One such tool is method draw. The best part about this application is that is web-based so you don’t need to download and install it. The best part about this tool is that it is free.


    This particular application is a JavaScript library which helps you to build web charts that are built upon D3.js. These charts are formed with HTML, SVG (Scalable Vector Graphics) and CSS. As of now, there are two types of charts available for you to choose from; bar and line graph. You can very easily customize these two graphs using CSS and of course that all depends upon you.


    The use of computers to check the e-mail is very minimum according to statistics and everyday more and more people are shifting to the mobile phone medium in order to check their e-mails. For you to check your e-mails on your phone it is imperative for you to receive them too. You can use these responsive e-mail templates and there’s five different ones you can choose from.


    It is a fact that creating a responsive e-mail might prove to be a bit challenging but it still is nothing compared to creating a responsive table. It is very tricky as we are sure you must know. There are many solutions available to make the process wee bit simpler one of which is Footable. It is a jQuery plugin that should make you tables responsive and too a bit easily.


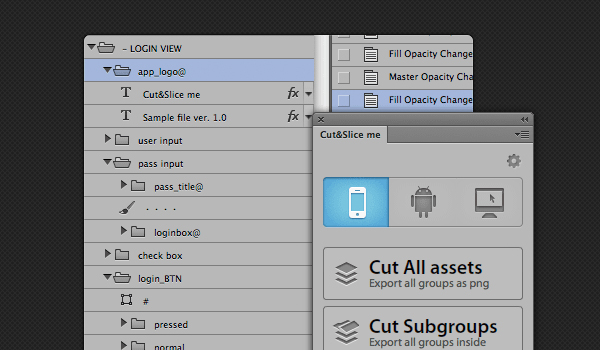
    Cut and Slice is a free Photoshop plugin which should allow you to slice your Photoshop layers in order for you to use them in web and it should be able to do that in seconds. It is free but it is only available for CS6 so the rest of you might have to wait. You guys are aware of how difficult and time-taking the job of slicing layers for web can be and especially so if you have millions of them.


    If you are using jQuery, folding effect shouldn’t be that big of a deal to you when it comes to web development. You have many free plugins available to you that are able to create such visuals so what is different with PFold? Well, you know how you fold the paper and unfold it back to its original straight or change the shape and everything? PFold sort of does the same thing. You can even aim the fold direction to wherever you want so it’s more interesting.


    If you have visited the website called Pinterest then you are sure to know that they present their information in the layout of a grid. For those of you who don’t know, Pinterest has to do with social media. Anyway, using this little tool you can create similar grid layouts. This plugin is actually responsive so it makes the job way better than your average tools.


    There are many different functions introduced with CSS3 and even though they are awesome, for example the transformation and transition function; they tend to get a little complex. In order to ease things a little, Adem Ilter has created this tool called Liffect. It adds unbelievably cool effects including Star Wars effects. Can it get more awesome then Star Wars? I guess not.


    This is a very light jQuery puglin which helps you create 3D dropdown effect. The name should make it clear that the effect actually looks like Makisu it is folds down. For those of you who don’t know, Makisu is a mat which is woven from bamboo and cotton string which is used in food preparation. It is usually how sushi is rolled. The 3D effects offered by Makisu are built upon CSS 3D transformation so you should only be able to see these effects on modern updated browsers.


    This post is adopted from:
    Post Source: Reference Link