.

Five Page Navigation Styles For Blogger - Part 2


This is the Part 2 of this Tutorial. This Tutorial is about how  to change Page Navigation Style for blogger with Five Page Navigation Styles. I am pretty sure, you will like these styles. The most important thing in this tutorial is that this Tutorial is lengthy so it will take your time to change Page Navigation Style for blogger, because this is the Part 1 of this tutorial. But you don't have to worry about this because i have arrange this tutorial so that you find easy to perform these following steps and that's why i divided this tutorial in two parts.

This is the view of those Page Navigations Styles.


Style 1

.blog-pager,#blog-pager{
  font-family:"Times New Roman", Times, serif;
  font-weight:normal;
  width:500px;
  font-size: 0.8em;
  padding: 0.6em 0.5em;
background: #3E3E3E;
 } 
.showpageNum a,.showpage a {
  text-decoration: none;
  padding: 0.3em 0.5em;
  color: #055d90;
  white-space: nowrap;
  background: #3E3E3E;
  color: #ffffff;
      margin-right: 0.1em;
  }  
.showpageNum a:hover,.showpage a:hover {
background: #EC5210;
  }
.showpageOf{
  margin:0 8px 0 0;
  display:none;
  }
.showpagePoint {
  text-decoration: none;
  padding: 0.3em 0.5em;
  color: #055d90;
  white-space: nowrap;
  background: #313131;
  color: #868686;
  margin-right: 0.1em;
  }


Style 2 

.blog-pager,#blog-pager{
  font-family:"Times New Roman", Times, serif;
  font-weight:normal;
  width:500px;
  font-size: 0.8em;
  padding: 0.6em 0.5em;
  background-color:#000000;
  text-align:center;
 } 
.showpageNum a,.showpage a {
  text-decoration: none;
  padding: 0.3em 0.5em;
  color: #055d90;
  white-space: nowrap;
  color: #ffffff;
   margin-right: 0.1em;
  }  
.showpageNum a:hover,.showpage a:hover {
 color:#A30A1A;
 text-decoration:none;
 background-color:#ffffff;
  }
.showpageOf{
  margin:0 8px 0 0;
  display:none;
  }
.showpagePoint {
color:#ffffff;
text-decoration:none;
background-color:#A9061B;
width:36px;
height:16px;
font-size:12px;
padding-left:5px;
padding-right:6px;
padding-top:3px;
padding-bottom:4px;
  }


Style 3 

.blog-pager,#blog-pager{
 font-family:Arial, Helvetica, sans-serif;
 font-size:11px;
 width:500px;
 text-align:center;
 } 
.showpageNum a,.showpage a {
 float:left;
 line-height:14px;
 padding:2px 4px 0;
 min-width:8px;
 border:1px solid #d7dce0;
 color:#848a8c;
 text-decoration:none;
 margin:0 3px;
 }  
.showpageNum a:hover,.showpage a:hover {
 color:#fff;
 background:#7f8487;
 border-bottom-color:#848a8c;
 }
.showpageOf{
  margin:0 8px 0 0;
  display:none;
  }
.showpagePoint {
 color:#fff;
 background:#7f8487;
 border-bottom-color:#848a8c;
 float:left;
 line-height:14px;
 padding:2px 4px 0;
 min-width:8px;
 border:1px solid #d7dce0;
 text-decoration:none;
  }


Style 4 

.blog-pager,#blog-pager{
 font-size: 0.6em;font-family:verdana;
 padding: 0.2em 0.5em; 
 margin-right: 0.1em; 
 border:1px solid #FFF; 
 background: #FFF; text-decoration: none;
 width:500px;
 } 
.showpageNum a,.showpage a {
 color: #693; 
 text-decoration: underline;
 border: 1px solid #E3E3E3; 
 text-decoration: none; 
 padding: 0.2em 0.5em;
 }  
.showpageNum a:hover,.showpage a:hover {
 border: 1px solid #693;
  }
.showpageOf{
  margin:0 8px 0 0;
  display:none;
  }
.showpagePoint {
 border: 1px solid #693;
 padding: 0.2em 0.5em;
 font-weight: bold; 
 background: #693; color: #FFF;
  }


Style 5 

.blog-pager,#blog-pager{
  font-family:"Times New Roman", Times, serif;
  font-weight:normal;
  width:500px;
  font-size: 0.8em;
 } 
.showpageNum a,.showpage a {
  display: block;
  float: left;
  padding: 3px 5px 3px 5px;
  margin-right: 3px;
  border: 1px solid;
  color: #FF6400;
  border-color: #FF6400;
  background: #FFF url(http://i1133.photobucket.com/albums/m596/abu-farhan/Meneame.png) bottom left repeat-x;
  text-decoration:none;
 }  
.showpageNum a:hover,.showpage a:hover {
  border-color: #FF9400;
  background: #FFBE94;
  color: #FF6400;
  }
.showpageOf{
  margin:0 8px 0 0;
  display:none;
  }
.showpagePoint {
  border-color: #FF9400;
  background: #FFBE94;
  color: #FF6400;
  border: 1px solid;
  font-weight: bold;
  display: block;
  float: left;
  padding: 3px 5px 3px 5px;
  margin-right: 3px;
  }


Step 1:
1: Go To Blogger > Design > Page Elements
2: Don't check the "Expand widget Templates" box
3: Search for ]]></b:skin>

4: Copy your desired css script from above
5: Just before ]]></b:skin>  paste the css script

Step 2: 
6:  Search for </body>
7: Just before </body>  paste this: 
<script type='text/javascript'>;var home_page='/';var urlactivepage=location.href;var postperpage=7;var numshowpage=4;var upPageWord ='Prev';var downPageWord ='Next';</script>;<script src='http://scriptabufarhan.googlecode.com/svn/trunk/pagenaviv202-min.js' type='text/javascript'></script>
Change this based on your blog setting:
var postperpage=7;
var numshowpage=4;
postperpage : How many posts per page for your blog.numshowpage : How many number will show in your page navigation.
Just change the numbers only.

8: Save it.
Step 3: 
9:  Again go to the Edit HTML page and check the "Expand widget Templates" box
10: Search for this:
'data:label.url'

11: Replace this with:
'data:label.url + &quot;?&amp;max-results=7&quot;'
Change 7 base on how many post per page you want to show.

12: Save it. You are done.
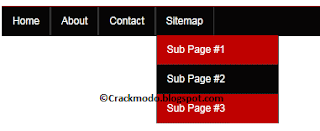

How To Create A Drop Down Menu?


A drop down menu is needed when you have too much content on your blog or you want to keep things organized. So this articles is for those who don't know how to create a Drop Down Menu. To add a drop down menu to your blogger blogs follow these steps:


Drop Down Menu


1: Go To Blogger > Design > Page Elements
2: Select a HTML/JavaScript Widget just under the header and paste the following code         inside it,            
Drop Down Menu


<div id='mbtnavbar'>
      <ul id='mbtnav'>
        <li>
          <a href='#'>Home</a>
        </li>
        <li>
          <a href='#'>About</a>
       </li>
        <li>
          <a href='#'>Contact</a>
        </li>
  <li>
           <a href='#'>Sitemap</a>
            <ul>
                <li><a href='#'>Sub Page #1</a></li>
                <li><a href='#'>Sub Page #2</a></li>
                <li><a href='#'>Sub Page #3</a></li>
              </ul>

        </li>
      </ul>
    </div>

Replace # with your Page Links and the bolded text with relevant page names. The yellow highlighted code is responsible for the drop down menu. You can copy and paste it under any tab you want just before </li>
To add another tab just paste this code above </ul>
<li>
          <a href='#'>Tab Name</a>
        </li>
       
    
3.   Now Go to Design > Edit HTML
4.   Backup your template and search for ,
]]></b:skin>

5.   Just above it paste the code below,
/*----- Drop Down Menu ----*/

#mbtnavbar {
    background: #060505;
    width: 960px;
    color: #FFF;
        margin: 0px;
        padding: 0;
        position: relative;
        border-top:0px solid #960100;
        height:35px;
}

#mbtnav {
    margin: 0;
    padding: 0;
}
#mbtnav ul {
    float: left;
    list-style: none;
    margin: 0;
    padding: 0;
}
#mbtnav li {
    list-style: none;
    margin: 0;
    padding: 0;
        border-left:1px solid #333;
        border-right:1px solid #333;
        height:35px;
}
#mbtnav li a, #mbtnav li a:link, #mbtnav li a:visited {
    color: #FFF;
    display: block;
   font:normal 12px Helvetica, sans-serif;    margin: 0;
    padding: 9px 12px 10px 12px;
        text-decoration: none;
 
}
#mbtnav li a:hover, #mbtnav li a:active {
    background: #BF0100;
    color: #FFF;
    display: block;
    text-decoration: none;
        margin: 0;
    padding: 9px 12px 10px 12px;


}
#mbtnav li {
    float: left;
    padding: 0;
}
#mbtnav li ul {
    z-index: 9999;
    position: absolute;
    left: -999em;
    height: auto;
    width: 160px;
    margin: 0;
    padding: 0;
}
#mbtnav li ul a {
    width: 140px;
}
#mbtnav li ul ul {
    margin: -25px 0 0 161px;
}
#mbtnav li:hover ul ul, #mbtnav li:hover ul ul ul, #mbtnav li.sfhover ul ul, #mbtnav li.sfhover ul ul ul {
    left: -999em;
}
#mbtnav li:hover ul, #mbtnav li li:hover ul, #mbtnav li li li:hover ul, #mbtnav li.sfhover ul, #mbtnav li li.sfhover ul, #mbtnav li li li.sfhover ul {
    left: auto;
}
#mbtnav li:hover, #mbtnav li.sfhover {
    position: static;
}
#mbtnav li li a, #mbtnav li li a:link, #mbtnav li li a:visited {
    background: #BF0100;
    width: 120px;
    color: #FFF;
    display: block;
    font:normal 12px Helvetica, sans-serif;
    margin: 0;
    padding: 9px 12px 10px 12px;
        text-decoration: none;
z-index:9999;
border-bottom:1px dotted #333;

}
#mbtnav li li a:hover, #mbtnavli li a:active {
    background: #060505;
    color: #FFF;
    display: block;     margin: 0;
    padding: 9px 12px 10px 12px;
        text-decoration: none;
}
Make these changes:
  • Change #060505 to change background color of the Main menu
  • Change  the yellow highlighted text to change font color, size and family
  • Change #BF0100 to change the background of a tab on mouse hover
  • Change #BF0100 to change the background color of the drop down menu
  • Change #060505 to change the background color of drop down menu on mouse hover
  • 6:    Save your template and you are done!


Medium Layered Hairstyles


Medium layered hairstyles have hundreds of hairstyles. Medium layered hairstyles give you chic and glamorous look for which you are waiting.  Medium layered hairstyles are alluring hairstyles. These hairstyles boost your personality look and confidence. These hairstyles are best for changeover your taste.  You can improve your styling look by adding layers.

Medium Layered Hairstyles

Medium Layered Hairstyles

Medium Layered Hairstyles

Medium Layered Hairstyles

Medium Layered Hairstyles

Medium Layered Hairstyles

Medium Layered Hairstyles

Medium Layered Hairstyles

Layered hairstyles are trendy hairstyles, you can get stylish, flattering and attractive look. Layers are best for those who have thin hair as layers work best and give bouncy and voluminous look. With the help of layers you can break one dimensional structure. You can get a sensual and softened effect with medium layered hairstyles.  You can try edgy and sharp layers with infuse innovative allure to get messy look. You can take complete benefit of these iconic styles with shoulder length bob cut or chin. To get trendy hairstyles complement your hair with graduate section. Asymmetry helps you to introduce natural bounce and volume into your thin hair. You can get rid of the bulky texture and split end with the help of these hairstyles. The girls who don’t afraid to wear different hairstyles can easily try asymmetry.  You can add extra glamour to your mid length hair with choppy layered bangs. It’s your preferences that you sweep your fringe one side or you wear bangs in natural way.

Medium layered hairstyles allow you to wear classic bob with variation. This is for front layers sections. These hairstyles provide your face a defined frame and create a balance look. Little amount of styling gel will give you a messy look. Styling gel also improves your hair texture. You can try soft waves, chic curls and perfect straight hairs, this will accentuate your super healthy looks. Use of smoothing gel for sizzling and smooth finish can be an additional thing for better look. No one else hairstyle is more flexible and ease than medium length hairstyles. You should check all hairstyles which can be try with medium length hairstyles.

Upswept twist is the quickest and easiest look hairstyles. Simple gather the long hair at back like ponytail, twist tail up and pin in place. Butterfly clip are also best for formal look or you can pin it with hair pins. Use small inch long barrater or clip to secure twist. There are hundreds of super cute hairstyles with medium length hairstyles.


Michael Jackson The Legend - Wallpapers


Michael Jackson was an American artist (singer), entertainer, actor and businessman. Often known as King of Pop. He is recognized as most successful artist, entertainer of all time by Guinness World Records. He debuted on professional music along with his brothers in 1964. He was a Legend and He is a Legend. No one full fill his place. He has billions of fans in all over the world. A person who love music also love Michael JacksonThis article is about Michael Jackson and contains his awesome HD wallpapers. 


 Michael Jackson wallpapers


Michael Jackson wallpapers

Michael Jackson wallpapers

Michael Jackson wallpapers

Michael Jackson wallpapers

Michael Jackson wallpapers

Michael Jackson wallpapers

Michael Jackson wallpapers

Michael Jackson wallpapers

Michael Jackson wallpapers

Michael Jackson wallpapers

Michael Jackson wallpapers

Michael Jackson wallpapers

Michael Jackson wallpapers

Michael Jackson wallpapers

Michael Jackson wallpapers

Michael Jackson wallpapers

Michael Jackson wallpapers

Michael Jackson wallpapers

Michael Jackson wallpapers

Michael Jackson wallpapers

Michael Jackson wallpapers

Michael Jackson wallpapers

Michael Jackson wallpapers

Michael Jackson wallpapers

Michael Jackson wallpapers

Michael Jackson wallpapers

Michael Jackson wallpapers

Michael Jackson wallpapers

Michael Jackson wallpapers

Michael Jackson wallpapers

Michael Jackson wallpapers

Michael Jackson wallpapers

Michael Jackson wallpapers

Michael Jackson wallpapers

Michael Jackson wallpapers

Michael Jackson wallpapers

Michael Jackson wallpapers

Related Articles: